Spring Security6 - 入门学习安全框架
Spring Security
Spring Security 依赖导入之后,再次访问我们编写的 Controller API 接口都会要求先登录获取一个 JSESSIONID,才能让我们访问项目下的 API 接口,否则,导航到一个登录页面进行登录。
不过,现在大部分都是通过 JWT(Token)来做身份验证,所以,后期也会取消 JSESSIONID 管理,改用获取请求头发送过来的 Token,通过 Token 获取用户名。查询数据库中是否存在该用户,以及用户的权限,通知 Spring Security 该请求认证通过,并且具有相应的权限。
过滤链(FilterChain)
既然要做安全认证,那就应该在访问接口之前就拦截下来,进入认证流程。所以,在访问接口之前,要先经过一堆过滤器,拦截所有的没有配置放行的接口(URL)。
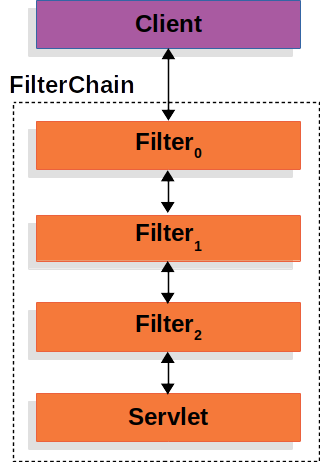
假如项目是 JWT 认证机制,在客户端发送一个请求时,携带上它浏览器存储的 Token 到请求头 Authorization 中,在经过一个我们自定义一个 AuthJwtFilter,但是这个过滤器要在 Spring Security 默认的过滤器之前,否则我们配置的过滤器无法第一时间拦截请求做认证。
tip:[start]
Token 存储在请求头哪里都无所谓,请求头你可以自定义一个,也可以填充规定里面的 Authorization 中,取决于你自己。
tip:[end]
file:[SecurityConfig]
@Configuration
@EnableWebSecurity
@EnableGlobalMethodSecurity(prePostEnabled = true)
public class SecurityConfig {

    @Resource
    private AuthJwtFilter authJwtFilter;

    @Bean
    public SecurityFilterChain filterChain(HttpSecurity http) throws Exception {
        // ......
        lit:[http.addFilterBefore(authJwtFilter, UsernamePasswordAuthenticationFilter.class);]
        return http.build();
    }

}
默认的认证过滤器就是 UsernamePasswordAuthenticationFilter,在它之前做 JWT 认证就可以了。
自定义过滤器
过滤器中拦截到请求之后,每次都进行身份认证,具体该如何做?
- 获取请求是否携带 Token,检验 Token 是否合法,等一系列前置工作。
- 解析 JWT 中存储的用户名,或者其他数据库中的主键值,必须要唯一的。
- 查询数据库中是否存在该用户。
- 如果存在该用户,给 SecurityContext 设置 UsernamePasswordAuthenticationToken,代表认证通过。
- 如果不存在该用户,不做第四步的工作,直接交给下一个过滤链。
file:[AuthJwtFilter]
@Component
public class AuthJwtFilter extends OncePerRequestFilter {

    @Resource
    private LoginMapper mapper;

    @Resource
    private RedisTemplate<String, String> redisTemplate;

    @Override
    protected void doFilterInternal(HttpServletRequest request, HttpServletResponse response, FilterChain filterChain) throws ServletException, IOException {
        // 1. 获取 Token
        String authorization = request.getHeader("Authorization");
        // 2. 解析 Token
        Claims claims = JwtUtil.parseJwt(authorization);

        // 3. Token 是否正确
        if (claims != null) {
            // 4. 校验 Token 是否过期
            String jwtId = claims.getId();
            Long expire = redisTemplate.getExpire(jwtId);
            // 5. Token 没有过期,代表可以认证
            if (expire != null && expire != -2) {
                // 从数据库中查询该用户对应的权限
                List<String> authorities = mapper.queryAuthorities(Map.of("username", claims.get("username")));
                UserDetails details = JwtUtil.toUserDetails(claims, authorities);

                SecurityContext context = SecurityContextHolder.createEmptyContext();
                // 6. 要让 Spring Security 知道认证通过,必须提供一个它定义的 UserDetails 类,构造器第一个和第三个参数必须给,一个是认证主体,一个是认证主体的权限
                UsernamePasswordAuthenticationToken authentication =
                        new UsernamePasswordAuthenticationToken(details, details.getPassword(), details.getAuthorities());
                context.setAuthentication(authentication);

                SecurityContextHolder.setContext(context);
            }
        }
        // 最重要的一步,放行
        filterChain.doFilter(request, response);
    }

}
AuthenticationEntryPoint
认证过程中,数据库连接错误,等内部问题,或者认证失败的问题都会进入这个处理器。
file:[AuthJwtEntryPointHandler]
@Component
public class AuthJwtEntryPointHandler implements AuthenticationEntryPoint {

    @Override
    public void commence(HttpServletRequest request, HttpServletResponse response, AuthenticationException authException) throws IOException, ServletException {
        response.setContentType("application/json;charset=utf-8");
        AuthVoR vo = new AuthVoR();

        vo.setMessage("认证被拒绝,具体问题联系管理员。");
        vo.setCode(Codes.AUTHORITY_UNKNOWN_ERROR);

        response.getWriter()
                .write(JSON.toJSONString(vo));
    }

}
AccessDeniedHandler
Token 有效,但是权限不足进入这个处理器。
file:[AuthJwtAccessDeniedHandler]
@Component
public class AuthJwtAccessDeniedHandler implements AccessDeniedHandler {

    @Override
    public void handle(HttpServletRequest request, HttpServletResponse response, AccessDeniedException accessDeniedException) throws IOException, ServletException {
        response.setContentType("application/json;charset=utf-8");
        AuthVoR vo = new AuthVoR();
        vo.setCode(Codes.AUTH_NOT_ENOUGH);
        vo.setMessage("权限不足!请联系管理员升级权限。");
        response.getWriter()
                .write(JSON.toJSONString(vo));
    }

}
配置 Spring Security
file:[SecurityConfig]
@Configuration
@EnableWebSecurity
@EnableGlobalMethodSecurity(prePostEnabled = true)
public class SecurityConfig {

    @Resource
    private AuthJwtFilter authJwtFilter;

    @Resource
    add:[private AuthJwtEntryPointHandler authJwtEntryPointHandler;]

    @Resource
    add:[private AuthJwtAccessDeniedHandler authJwtAccessDeniedHandler;]

    @Bean
    public SecurityFilterChain filterChain(HttpSecurity http) throws Exception {
        add:[http.exceptionHandling(conf -> conf]
                add:[.authenticationEntryPoint(authJwtEntryPointHandler)]
                add:[.accessDeniedHandler(authJwtAccessDeniedHandler)]
        add:[);]

        http.addFilterBefore(authJwtFilter, UsernamePasswordAuthenticationFilter.class);

        return http.build();
    }

}
自定义登录接口
Spring Security 提供了一个默认的登录接口,在实际的项目当中,我们不需要它提供的默认登录页面和接口以及逻辑。
UserDetailsService
实现 UserDetailsService,重写 loadUserByUsername 函数。我使用了 MybatisPlus,所以继承了 ServiceImpl。
file:[LoginServiceImpl]
@Service
public class LoginServiceImpl extends ServiceImpl<UserMapper, User> implements UserDetailsService {

    @Override
    public UserDetails loadUserByUsername(String username) throws UsernameNotFoundException {
        // 1. 从数据库中查询用户
        User user = findUserByFiled(username);
        // 2. 用户是否存在,不存在抛出异常,结束登录
        if (user == null) {
            throw new UsernameNotFoundException("用户名或密码错误!");
        }

        // 3. 返回规定的 User 实体类
        return org.springframework.security.core.userdetails.User
                .withUsername(user.getUsername())
                // 注意,密码的加密方式必须要和配置的加密方式一致,并且这不是一个明文密码,是加密密码
                .password(user.getPassword())
                .authorities(authorities.toArray(new String[0]))
                .build();
    }

    private User findUserByFiled(String field) {
        return query()
                .eq("username", field)
                .or()
                .eq("email", field)
                .or()
                .eq("phone", field)
                .one();
    }

}
AuthenticationSuccessHandler
登录成功进入这个处理器处理。我们在这里创建 JWT,并返回给前端存储。
file:[LoginSuccessHandler]
@Component
public class LoginSuccessHandler implements AuthenticationSuccessHandler {

    @Resource
    private RedisTemplate<String, String> redisTemplate;

    @Override
    public void onAuthenticationSuccess(HttpServletRequest request, HttpServletResponse response, Authentication authentication) throws IOException, ServletException {
        response.setContentType("application/json;charset=utf-8");
        UserDetails details = (User) authentication.getPrincipal();

        String jwtUuid = UUID.randomUUID().toString();
        Long expire = JwtUtil.getExpire();
        String token = JwtUtil.createJwt(details, jwtUuid, expire);

        redisTemplate.opsForValue().set(jwtUuid, token, expire, TimeUnit.SECONDS);

        AuthVoR vo = new AuthVoR();
        vo.setToken(token);
        vo.setExpire(JwtUtil.getExpire());
        vo.setMessage("登录成功!");
        vo.setCode(Codes.SUCCESS);

        response.getWriter()
                .write(JSON.toJSONString(vo));
    }

}
AuthenticationFailureHandler
登陆失败的处理器。
file:[LoginFailureHandler]
@Component
public class LoginFailureHandler implements AuthenticationFailureHandler {

    @Override
    public void onAuthenticationFailure(HttpServletRequest request, HttpServletResponse response, AuthenticationException exception) throws IOException, ServletException {
        response.setContentType("application/json;charset=utf-8");
        AuthVoR vo = new AuthVoR();
        vo.setMessage("用户名或密码错误!");
        vo.setCode(Codes.PASSWORD_OR_USERNAME_ERROR);
        response.getWriter()
                .write(JSON.toJSONString(vo));
    }

}
配置 Spring Security
file:[SecurityConfig]
@Configuration
@EnableWebSecurity
@EnableGlobalMethodSecurity(prePostEnabled = true)
public class SecurityConfig {

    @Resource
    private AuthJwtFilter authJwtFilter;

    @Resource
    add:[private LoginSuccessHandler loginSuccessHandler;]

    @Resource
    add:[private LoginFailureHandler loginFailureHandler;]

    @Resource
    private AuthJwtEntryPointHandler authJwtEntryPointHandler;

    @Resource
    private AuthJwtAccessDeniedHandler authJwtAccessDeniedHandler;

    @Bean
    add:[public BCryptPasswordEncoder passwordEncoder() {]
        add:[return new BCryptPasswordEncoder();]
    add:[}]

    @Bean
    public SecurityFilterChain filterChain(HttpSecurity http) throws Exception {
        add:[http.authorizeHttpRequests(auth -> {]
            add:[auth.requestMatchers("/api/auth/**").permitAll();]
            add:[auth.anyRequest().authenticated();]
        add:[});]

        add:[http.formLogin(conf -> conf]
                add:[.loginProcessingUrl("/api/auth/login")]
                add:[.successHandler(loginSuccessHandler)]
                add:[.failureHandler(loginFailureHandler)]
        add:[);]

        http.exceptionHandling(conf -> conf
                .authenticationEntryPoint(authJwtEntryPointHandler)
                .accessDeniedHandler(authJwtAccessDeniedHandler)
        );

        add:[http.csrf(AbstractHttpConfigurer::disable);]
        add:[http.cors(AbstractHttpConfigurer::disable);]
        add:[http.sessionManagement(session -> session.sessionCreationPolicy(SessionCreationPolicy.STATELESS));]

        http.addFilterBefore(authJwtFilter, UsernamePasswordAuthenticationFilter.class);

        return http.build();
    }

}