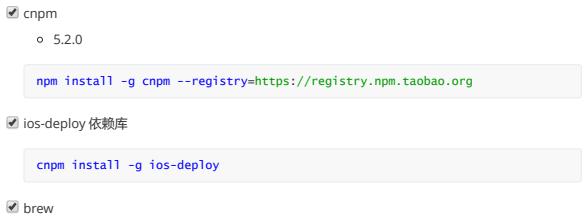
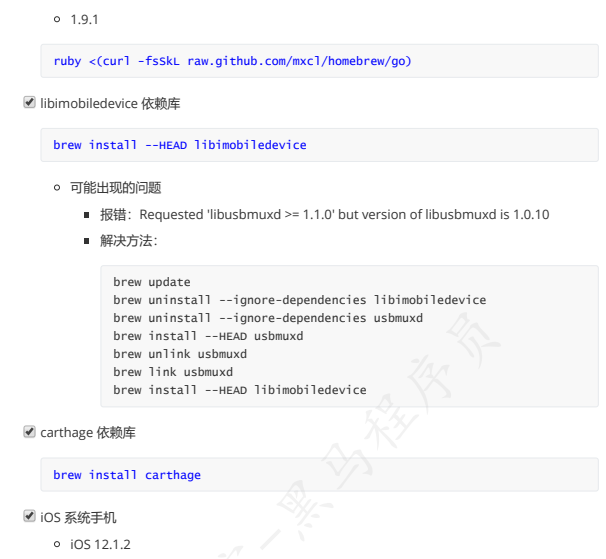
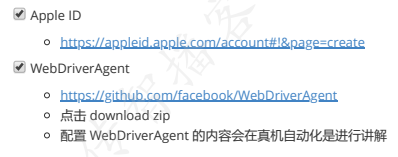
1-环境搭建
2-使用模拟器进行自动化测试
2.1 运行IOS程序到模拟器
2.2查看IOS元素特征
- 步骤
- 打开 appium
- 启动 appium
- 左上角菜单栏选择 appium - new session window
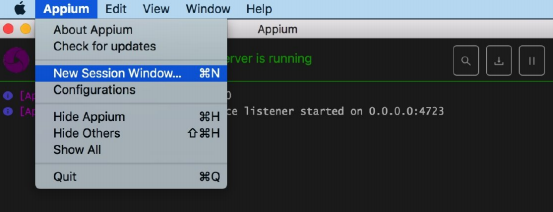
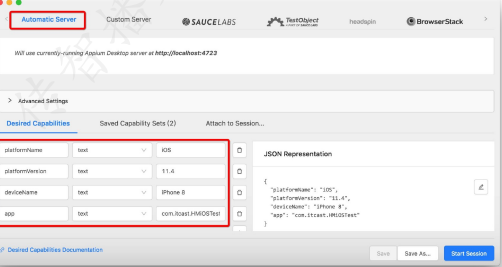
4.填写对应的启动参数,并启动
2.3编写和运行自动化脚本
from appium import webdriver
desired_caps = dict()
desired_caps['platformName'] = 'iOS'
desired_caps['platformVersion'] = '12.1'
desired_caps['deviceName'] = 'iPhone 8'
desired_caps['app'] = 'com.itcast.HMiOSTest'
driver = webdriver.Remote('http://localhost:4723/wd/hub', desired_caps)
- 需求
- 点击按钮 进入列表
- 获取所有列表的文字内容并输入
- 滑动一次
- 点击 20
- 清空文本框内容
- 在文本框中输入 “hello”
- 单击返回按钮
time.sleep(1)
driver.find_element_by_id("进入列表").click()
time.sleep(1)
eles = driver.find_elements_by_class_name("XCUIElementTypeStaticText")
for i in eles:
print(i.text)
time.sleep(1)
# 无法使用
# driver.swipe(100, 2000, 100, 1000)
driver.execute_script("mobile: swipe", {"direction": "up"})
time.sleep(1)
driver.find_element_by_xpath("//*[@name='20']").click()
time.sleep(1)
text_view = driver.find_element_by_class_name("XCUIElementTypeTextField")
text_view.clear()
time.sleep(1)
text_view.send_keys("hello!!!")
time.sleep(1)
driver.find_element_by_xpath("//XCUIElementTypeButton[@name='Back']").click()
time.sleep(1)
- 官方已经明确表示 swipe 等 API 在模拟器 7.x - 8.x 中无法使用,真机并未提及。(Appium 1.8 + 模拟器和真机的 iOS 11 是可以使用的。)工作中,如果碰到这种情况,就用 execute_script 的方法实现即可。
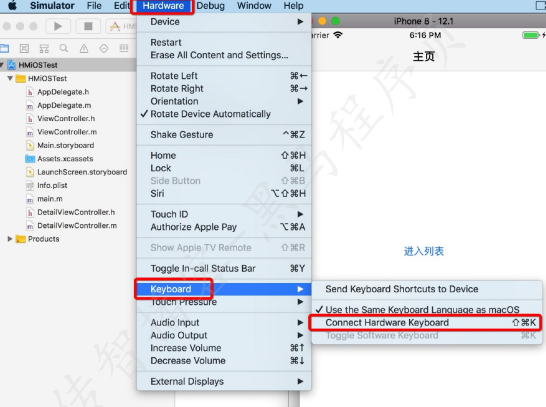
- 在模拟器中可以连接电脑的键盘进行输入,但是如果连接,appium 将无法工作,所以需要消选 Connect Hardware Keyboard选中模拟器 - 左上角 Hardware - Keyboard - 消选 Connect Hardware Keyboard
3、使用真机进行自动化测试
3.1运行iOS程序到真机
- 在 Xcode 中登录自己的 Apple ID
- 配置开发者信息
- 选择将要运行的 程序 和 设备
- 快捷键 command + r 运行
- 在手机中进入 设置 - 通用 - 设备管理 - 自己Apple ID - 信任程序
- 重新 command + r 运行
3.2配置WebDriverAgent
- 进入到下载的 WebDriverAgent 项目下
- 输入命令 ./Scripts/bootstrap.sh
- 启动 WebDriverAgent.xcodeproj
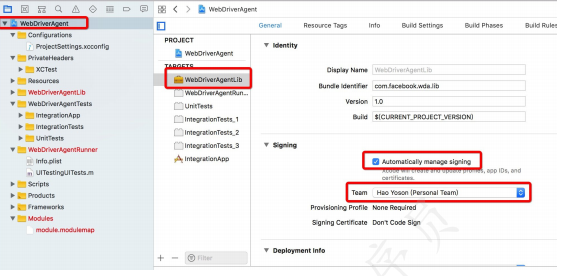
- 配置 WebDriverAgentLib 的开发者信息
- 配置 WebDriverAgentRunner 的开发者信息
- 配置 IntegrationApp 的开发者信息
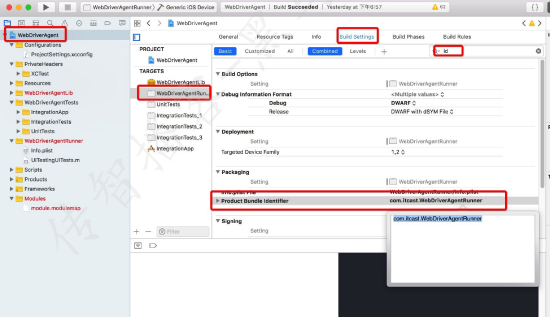
- 修改 WebDriverAgentRunner 的 Product Bundle Identifier
- 修改 IntegrationApp 的 Product Bundle Identifier
- 数据线连接真机
- 选择将要运行的 WebDriverAgentRunner 和 真机设备
- 使用 command + u 运行 稍等之后会在log中出来一个 url 地址
在浏览器中打开这个地址,如果显示一串 json 数据即为正确连接手机
并且,真机会多一个程序
- 将配置好的 WebDriverAgent 项目替换到 appium 的 WebDriverAgent 项目
打开 finder
快捷键 command + shift + g
输入路径 /Applications/Appium.app/Contents/Resources/app/node_modules/appiumxcuitest-driver
回车
将旧项目换个名字,当做备份
将配置好的项目放在这个目录下
3.3运行自动化脚本
- 修改对应的 platformVersion、deviceName
- 查看 udid 并增加为启动参数
- 运行即可